A few years ago I discovered “meals in a jar”, and at the risk of sounding overly dramatic, it kinda changed my life. In a good way. What exactly IS a meal in a jar (MIJ)? Its a good, healthy meal, ready in a matter of minutes, prepared ahead for such a time as this. The variety of options is endless, limited only by your imagination. If you’re short on imagination at the moment, scroll down. I’m giving you a few of my favourite recipes below, with some suggestions for adjusting as seems appropriate.

Food storage has been a way of life for me, all my adult years. Why? Because it’s the SMART thing to do, that’s why. I saw the example in varying degrees throughout my childhood, but Dan and I took it to a whole new level as we practiced and learned, and increasingly saw the value of having a food storage. Not everybody’s food storage looks the same. With encouragement, suggestions, and the kinship one feels with other likeminded people, I developed my own plan that fit into our lifestyle. The best piece of advice I absorbed came from Spencer W. Kimball, who counselled “Store what you eat, and EAT what you store.”
When freeze dried food became more readily (and increasingly) available, storing high quality food became easier, and more nutritious. It also opened up a whole new world of possibilities for convenience. Yes, convenience and healthy, and long term shelf stable, can all exist on the same table at the same time. True, we generally focus on food storage as an emergency resource, but consider the innumerable minor emergencies that happen in the regular course of our week. Those days when you’ve been crazy busy, but the family still needs to eat supper. Those days when you just don’t have any good ideas or energy, but the family still needs to eat supper. Those days when you’re sick, and need to leave dinner up to someone else. Those times when money is short, and the fridge is bare, but the family still needs to eat. . . . You get the picture.
Meals in a jar (MIJ), properly sealed can last an easy five years, but personally I’m not interested in them lasting five years. With freeze dried food, I already have an excellent food storage that will last 25 years. What I’m looking for with MIJ – is convenience. I want a few meals our family will enjoy IN the pantry, close and handy for the day I need it. I want a few meals I know I can count on, that I can pass on to a friend or neighbour who could use a helping hand from time to time. But its gotta be healthy. That’s my one big criteria, my non-negotiable. No artificial additives. I still run with the motto “If you can’t say it, don’t eat it“, so homemade with ingredients I can trust is essential.
How long can you expect a MIJ to last with a good snug lid on it? Six months to a year is how long I keep mine, and I’ve never had a problem. MIJ are great options to keep on the shelf for THOSE emergencies! If you’re of a mind, and if you have a vacuum sealer, go ahead and seal them for longer shelf stability. But in the meantime, consider them part of your routine: your emergency dinner-to-the-rescue, to pull out when you need to get dinner on the table quick!

Ingredients:
Most MIJ recipes require freeze-dried foods of course, with perhaps some dehydrated ingredients. These are ever more readily available in stores and to order directly. Truth is, not all freeze dried food is the same quality, so do your homework when picking a reliable source. Personally, I prefer the quality of THRIVE LIFE foods – just Simple, Clean Food. The quality of your MIJ and the confidence you have in it’s shelf stability, can only be equal to the quality of the ingredients you use, and the care and attention you give to cleanliness when packing it.
Equipment:

Containers: I use wide mouth quart jars for family sized meals, and pint jars for smaller meals. I like glass because you can SEE – easy to know what is in there, and that they are airtight with a good lid.
Make sure they’re clean and DRY. And store in a cupboard away from light so the vibrant colours are not faded by the sun.
Jar funnel: Not necessary, but sure comes in handy to get everything INto the jar.
Measuring cups and spoons: Measurements are pretty important when you’re trying to fit it all into a jar.
Label: just something to write basic information like the name of the dish and how much water to add of course, but I learned a good lesson about including directions. One day when I had some visiting grandchildren, I was not well. Dan was working during the day, but when he got home, he pulled out a MIJ to whip up a quick and easy dinner. Occasionally, if I am intending to give the meal away, I’ll also include a list of ingredients on the label.
How to create your own recipe:

Once you have prepared a few MIJ’s, and have stored them and used them, you’ll become more familiar and comfortable with things you like about them. It will become easy to create your own recipes from existing favourite recipes. For instance: in a magazine while waiting to get my hair cut a few years ago, I came across some soup recipes that looked appealing. The one that caught my eye was for a “Bacon Corn Chowder”, using potatoes, corn, onions, celery, and bacon. As I reviewed it, I realized that I had all the necessary ingredients in my pantry (except the bacon). I could make this meal today, and better than that, if we liked it, I could create a MIJ for future meals. One of my favourite MIJ recipes came from adapting that one. I used Freeze Dried Sausage Crumbles instead of bacon. Perfect!
When I try out a brand new recipe I’m developing for a MIJ, I make two. One meal goes straight into the pot for dinner today, and the other, straight into the jar. This accomplishes two important things:
1) I want to TRY the recipe to ensure we like it before I invest too heavily
2) I want to see how it all fits together in the jar, so that I can make notes as needed. Ideally, I can fill many future jars from that recipe, so I want to ensure I’m happy with it.
Don’t forget a pen and paper to work out amounts and make corrections during the process.
* You can layer your ingredients in the jar in any order you want. If you put the bigger pieces in first, and end with the powders, you can shake the powder down through the other ingredients at the end and get more ingredients into the jar. Very practical but not very visually appealing. I’m all about ‘pretty’, so I prefer to begin my layering with the powders and then transition into bigger pieces as I get to the top. It looks much nicer. But, you be you; do what you want.
Recipes

Cindy’s Sausage Corn Chowder
This is the one that originated from that magazine recipe. Layer into a wide mouth quart jar:
1/4 cup Thrive Life Instant milk powder
1/4 cup Thrive Life Sour Cream powder
2 T Thrive Life Chicken Bouillon
1/3 cup Thrive Life Bechemel Sauce (or homemade cream soup base)
1 teaspoon thyme leaves, crumbled by hand
1/4 cup Thrive Life freeze dried chopped onions
2 T Thrive Life freeze dried celery, crumbled by hand
2 T Thrive Life dehydrated carrots (*I’ve tried a few varieties, but Thrive Life is by far the best)
1 cup Thrive Life dehydrated potato chunks*
1/2 cup Thrive Life Sausage Crumbles
Fill the remaining room with Thrive Life Sweet Corn
Secure lid, label and store in cool dark place.
* do NOT use freeze dried potatoes as they’ll just fall apart in the length of time you’ll want to simmer this chowder
to prepare: Dump jar ingredients into a pot with 2 cups of water. Turn medium heat on and bring to a slow boil while stirring to prevent clumping or scorching. When everything is beautifully combined and is beginning to thicken, pour remaining 3 cups of water (total of 5 cups). Bring back up to a slow-low boil and then reduce heat to simmer till potatoes are tender – 15-20 minutes. Stir frequently to prevent lumping or scorching as it thickens. When potatoes are tender, remove from heat and let sit for five minutes before serving.
Cindy’s Taco Soup in a Jar
in a wide mouth quart jar, layer the following:
1/2 cup Thrive Life Tomato Powder
1 T taco seasoning
1 T Thrive Life’s Chef Choice Seasoning (or your fave all purpose seasoning)
1 teaspoon cumin powder (I always put in more, but you’re the boss, you do you)
1 teaspoon salt
1 + 1/2 cup instant red beans
1 cup Thrive Life ground beef
1/3 cup dehydrated or freeze dried chopped onions
1/3 cup dehydrated peppers
3/4 cup Thrive Life freeze dried Sweet Corn
Secure lid, label and store in cool, dark place.
to prepare: Dump contents into 8 cups of water. Bring to boil, stirring frequently to prevent scorching bottom. Reduce heat, add up to 2 more cups water and bring to a and simmer for 20 – 30 minutes till beans are tender. Remove from heat and let sit 10 minutes to thicken. Sprinkle with shredded cheddar if desired and replace lid.
Serve with corn bread or taco chips. Enjoy!
Zuppa Toscana in a Jar
in a wide mouth quart jar, layer the following:
1/2 cup Thrive Life Sour Cream powder
2 T Thrive Life Veloute Sauce (chicken gravy)
1 T Thrive Life Chicken Bouillon
1/2 teaspoon garlic powder or 1 teaspoon freeze dried garlic
1/2 teaspoon crushed red pepper (optional)
1/2 cup Thrive Life freeze dried Spinach
1/4 cup Thrive Life freeze dried chopped onions
1 cup instant refried beans
1/2 cup Thrive Life Sausage crumbles
1 cup Thrive Life dehydrated potato chunks
Secure lid, label and store in cool, dark place.
to prepare: Dump contents into 8 cups of water. Bring to boil, stirring frequently to prevent lumps or scorching bottom. Reduce heat and simmer for about 20 minutes till potatoes are tender. Remove from heat and let sit 10 minutes to thicken.
Serve with grated parmesan cheese and fresh bread on the side.
Chicken Pot Pie Soup
in a wide mouth quart jar layer the following:
1 cup Thrive Life Bechemal Sauce (white cream sauce)
1 T Thrive Life Chicken Bouillon
1/4 cup Thrive Life Sour cream powder
1 T dried sage crumbled
1/4 t pepper
1 T parsley
2 T Thrive Life dehydrated carrots
1/3 cup Thrive Life freeze dried chopped onions
1 cup Thrive Life dehydrated potato chunks
1 cup Thrive Life chopped chicken
1/2 cup Thrive Life freeze dried peas
1/2 cup Thrive Life freeze dried sweet corn
Secure lid, label and store in cool, dark place.
to prepare: Add contents to 6 cups of water. Bring to a slow boil, stirring frequently to prevent lumping or scorching. Reduce heat and simmer 10-15 minutes stirring once in awhile to keep from scalding on bottom. Remove from heat and let sit 5 or 10 minute to thicken before serving.
what about meals that are NOT soups?
no problem!
Shepherd’s Pie
in a wide mouth quart jar, layer the following:
1/4 cup Thrive Life Bechemal Sauce (creamy white sauce)
2 T Thrive Life Tomato Powder
2 T Thrive Life Beef Bouillon
1 teaspoon freeze dried garlic
1 teaspoon crumbled dry oregano leaves
2 T Thrive Life dehydrated carrots
1/4 cup Thrive Life freeze dried chopped onions
1/4 cup Thrive Life freeze dried celery (crumbled by hand)
1+1/2 cup freeze dried vegetables of your choice (here I did a combination of freeze dried peas, corn, green beans, and butternut squash, but you can also add broccoli, cauliflower, peppers, spinach, asparagus, kale . . . etc)
Top off the jar with a few more vegetables if needed.
Secure lid, label and store in cool, dark place.

This becomes the base of your Shepherd’s Pie. You’ll want to cover with a layer of mashed potatoes, sprinkled with shredded cheese of your choice.
to prepare: Pour contents of jar into casserole dish, add 2+1/2 cup boiling water and stir to completely mix everything evenly, and to refresh it. Spread evenly in pan. Make up some instant mashed potatoes according to package directions (Thrive Life makes the best and purest instant potatoes I’ve ever tried). Layer the mashed potatoes over top and sprinkle with shredded cheese. (Thrive Life also has shredded cheese)
Bake in 350 degree oven for about 20 minutes to heat through and melt the cheese.
Beef Stroganoff
in a wide mouth quart jar, layer the following:
½ c. THRIVE Life Instant Milk
½ c. THRIVE Life Sour Cream Powder
2 Tbsp Cornstarch
1 tsp Garlic Powder
1 Tbsp THRIVE Life Beef Bouillon
¼ c. THRIVE Life Butter Powder
1/3 c. THRIVE Life Chopped Onions
1/3 c. THRIVE Life Celery – Freeze Dried
2/3 c. THRIVE Life Mushroom Pieces – Freeze Dried
2/3 c. THRIVE Life Diced Beef – Freeze Dried
2 c. Elbow Macaroni , rotini, egg noodles – your choice
Top off the jar with a few more vegetables if needed. Secure lid, label and store in cool, dark place.

to prepare: Throw and Go. Add all ingredients to 6 cups hot water and bring to a boil. Stir a few times to prevent sticking. When liquid comes to a boil, turn heat to low, cover, and simmer 12 minutes. Stir from time to time to prevent sticking. When pasta is cooked, turn heat off. Stir and let sit for 10 to 15 minutes to thicken.
*Option 1: For variety – substitute Egg Noodles for the pasta. Use a little less water and adjust cooking times slightly as egg noodles don’t take as long to cook. They also take a lot more room in the jar, which is why I usually use macaroni.
*Option 2: For the vegetable lover, add ½ c. THRIVE Life FD Red or Green Peppers in the last minute of cooking. You don’t really need to cook them, you just want to plump them up and heat through.
*Option 3: For a gorgeous Florentine Stroganoff, stir in ½ c. THRIVE Life FD Spinach after you turn off the heat.
*Option 4: Substitute THRIVE Life FD Ground Beef or THRIVE Life FD Shredded Beef for the meat. * DO NOT use freeze dried pulled pork, as the shelf life on pulled pork is considerably shorter (it being a high fat meat).
When you pour your stroganoff into your serving dish, generously sprinkle with Parsley and freshly ground pepper, or better yet, THRIVE’s Chef’s Choice All Purpose Seasoning Blend.
Enjoy!
Mac n Cheeseburger
in a wide mouth quart jar, layer the following:
½ cup Thrive Life Instant Milk (the very best)
2 T cornstarch
3/4 cup Thrive Life Cheese Sauce
1 T Beef Bouillon
1/3 cup Thrive Life Freeze Dried chopped onions
½ cup THRIVE Life FD Ground Beef
2 cups elbow macaroni
Secure lid, label and store in cool, dark place.

to prepare: Pour contents of jar into 6 cups hot water in a ‘big enough’ pot. Bring to a boil, stirring frequently to prevent sticking. When liquid comes to a boil, turn heat to low, cover, and simmer 10-12 minutes till pasta is tender, stirring once in a while to prevent sticking. When pasta is tender, turn heat off. Stir again, and let sit 5 minutes to thicken.
*option: add 1/2 cup FD shredded cheddar or mozzarella cheese for an even cheesier dish
*option: add 1/2 cup FD peas about 5 minutes before pasta has finished cooking
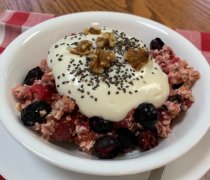
Fresher than Fresh Berry Muesli
This recipe has been adjusted to fit into a pint jar for a smaller, more portable serving.
So quick and easy to prep, and portable to throw in your bag to take for lunch or eat on a road trip.

In a wide mouth pint jar, layer the following:
1/2 cup Quick Oats
1/4 cup Thrive Life dehydrated Applesauce
1/4 cup Thrive Life freeze dried Blueberries
1/4 cup Thrive Life freeze dried Raspberries
1/4 cup Thrive Life Strawberry Slices
Jar will not be completely full, which is what you want to be able to stir the apple juice in later. Secure lid, label and store in cool, dark place.
to prepare: Add 1+ 1/2 cup apple juice, and stir in to completely moisten everything. Let it sit aside for up to five minutes to assure everything is completely absorbed. Enjoy!
– link to full recipe –
Smoothie in a Jar
now smoothies can be totally portable! For a long time (before RUVI became available) , I would blend small amounts of freeze dried fruits and vegetables in the blender and make a “smoothie-in-a-jar”. Convenient and nutritious to take when I was on the run and didn’t have time for a meal. Those are the times you’re tempted to pick up fast food right? But that’s exactly what I don’t want to do. Did you know? 1 Tablespoon of powdered vegetable = 1 serving. ? I just add a little cold water, shake up the jar and drink it. 4 servings of fruits and vegetables with all the nutritional goodness they have to offer. What a gift. You can use any combination you want but my favourite was the following.
1 Tablespoon pineapple powder (made from Thrive Life FD pineapple)
1 Tablespoon peach powder (made from Thrive Life FD peaches)
1 Tablespoon spinach powder (made from Thrive Life FD spinach)
1 Tablespoon kale powder (made from Thrive Life FD kale)
layer it or shake it up to mix.
This is POWER in a Jar. The natural enzymes of pineapple, the vitamin C of the peaches (and pineapple). The vitamin A, minerals and antioxidants of spinach and kale.
* Did you know? Thrive Life peaches have 21 times MORE Vitamin C than so called ‘fresh’ peaches from the grocery store in the middle of summer. Not even kidding. You read right – 21X more. Wanna know why? Because unlike the peaches we buy in the grocery store, which are picked green, Thrive Life fruits are picked when they are completely RIPE and at the height of nature’s perfection, being nutritionally complete. Everyone knows that produce begins to deteriorate within the first hour after harvest, so eating it ‘fresh’ is ideal. Thrive Life ensures that not only are those peaches picked ripe, but they are picked, peeled, sliced and flash frozen within 6 hours of harvest. That is why they retain 95% (or more) of their original natural goodness.
* Did you know? Spinach loses 100% of its vitamin C within 4 days of harvest! Yup, sad but true. When you buy so called ‘fresh’ spinach from the grocery store, there is ‘0’ (ZERO) vitamin C left in it. Thrive Life Spinach is picked, washed, chopped and flash frozen within 6 hours of harvest, retaining pretty much ALL its vitamin C plus a whole lotta other goodness. Up to 95%!
* hint: the natural sweetness of the fruits will eventually cause the fruit powder to compress. The vegetables will not, they’ll stay loose. So mixing up everything might not be as pretty, but it is more likely to stay loose. Your choice. You be you.
so what about desserts? Can you put those into a jar too? Absolutely!
Lemon Pound Cake from your pantry
this cake is good for so many reasons, and for so many things: from a simple elegant lemon pound cake, to a gorgeous berry lemon trifle, and everything in between. And its the perfect choice for a MIJ (except its not a ‘meal’). Just add water.
measure the following ingredients into a clean dry quart jar
1+1/2 cups flour
2 t baking powder
1/2 cup Thrive Life Butter powder
3/4 cup white sugar
1 T Thrive Life classic lemonade – or up to 2 T for those exceptional lemon fans
1/4 cup Thrive Life scrambled egg mix
1/2 t salt
3 T Thrive Life Instant milk
Secure lid, label and store in cool, dark place.

(made w the crumbled blueberries left in the bottom of a can of Freeze Dried Blueberries)
to prepare:
preheat oven to 350 F. Dump contents into a mixing bowl and with wire whisk, gently mix all ingredients till thoroughly combined. Form a well in the center and pour in 1+1/2 cup water. Stir just until everything is moistened. Pour into greased 9×9 pan and placed in center of oven. Bake about 40 minute, until center is done. Test by gently tapping center, then by inserting clean toothpick. When it comes out clean, remove from oven and set aside to cool. Cut and serve. Enjoy.
* option: drizzle with lemon glaze while still warm. Mix 1 T classic lemonade powder with 3 T water and slowly cream in sifted icing sugar to desired consistency. Drizzle over top. Or use 3 T of fresh lemon juice.
* option: add 2 T poppy seeds into dry ingredients
* option: add 1/2 cup freeze dried blueberries and a little extra water
Do you make Meals in a Jar already? If so, I’d love to hear about your favourite recipes. It’s always good to share. If you haven’t yet, I hope you’ll give it a try. If you don’t have enough freeze dried foods to get started, here’s what THRIVE LIFE has available. They are the biggest freeze drying company in North America, and their quality is second to NONE.
If you’d like suggestions of best ways to purchase, or if you have any questions on particular products, ask away – I use them ALL, and I can suggest best ones for MIJ.
Warmly,
Cindy Suelzle